When I first clicked “Enroll,” I didn’t know it would add up to 162 hours of training. That’s almost a full month of time — stolen from late nights, weekends, and early mornings before work.
Like a lot of people breaking into cybersecurity, I started with curiosity and a mess of browser tabs. YouTube videos, Reddit threads, course recommendations. It’s easy to drown in the noise. What made the difference wasn’t just finding the right content, it was learning how to stay with it long enough for the dots to connect.
Udemy became my training ground. Not glamorous, not perfect, but consistent. Over time, those 162 hours weren’t just “video time.” They became hours of repetition, frustration, and slow understanding.
There’s a phase in every learner’s path where you stop studying for a test and start thinking like the work.
That’s what those hours taught me, how to reason through a network like a puzzle, how to see the seams where systems and people meet, how to build patience in a field where curiosity is the only constant.
Looking back, those 162 hours weren’t just prep for certification. They were the price of entry, not into a career, but into a mindset.
Every scan that failed, every lab that wouldn’t load, every problem that took three days instead of three hours, they were all small rehearsals for the real work ahead.
And that’s the absolute truth about cybersecurity training: the time never feels fast, but it’s never wasted. You’re not just learning commands. You’re learning endurance. It’s the art of staying with a problem long enough to earn its answer.
This 8-week program is designed to improve overall strength, explosive power via Type IIx muscle fiber development, and speed in the clean using traditional strength training methods and post activation potentiation (PAP). PAP involves performing heavy strength exercises followed by explosive movements to enhance neuromuscular performance.
Program Structure & Purpose of This Method of Training
Weeks 1-4: Strength and Hypertrophy Focus
Builds a solid foundation of strength in the specific movements and build overall muscle mass.
Emphasis is on moderate to heavy weights with traditional strength training methods.
Weeks 5-8: Explosive Strength and Speed
Increase the focus on explosive movements and speed.
Utilize PAP techniques to develop explosiveness in the lifts and maximize power output.
Weekly Training Schedule
Monday: Strength and Clean Technique
Clean: 5 x 3 reps dropping each rep from the top, focusing on as close to perfect reps every set
Focus on technical perfection/bar control in all positions. Intensity: 70-80% of 1RM; rest 2-3mins between sets
B. Front Squat: Sets: 4
Reps: 6-8 (Weeks 1-4)
Reps: 4-6 (Weeks 5-8)
Intensity: 75-85% of 1RM
C. Romanian Deadlift – sets: 3 x 8-10; rest 2
D. Pull-Ups Sets: 4 x reps: 8-10 (weighted if possible); rest :90secs
E. Trunk Work – Russian Twists & leg raises – sets: 3 x 15-20; rest 1min b/t sets
Tuesday: Traditional Strength and PAP
Back Squat 5 x 5; rest 2-3 mins b/t sets — Intensity: 80-85% of 1RM
Clean Pull (Heavy) Sets: 4 x 3 — Intensity: 90-110% of clean 1RM PAP Complex: 3 sets C1. Heavy Back Squat: 3 reps at 85-90% of 1RM C2. MAX Vertical Jump: 3-5 reps immediately after each squat set; Rest: 2-3 minutes between complexes D. Shoulder Press: Sets: 4 x 6-8
Wednesday: EASY MAP 10/Active Recovery/Mobility
MAP 10 for 30-45 minutes or mobility work and stretching focusing on hips, shoulders, and ankles
Thursday: Strength and Clean Technique
Clean: Sets: 5 x 3
Intensity: 75-85% of 1RM
Focus on bar control in the first pull and FINISHing the second pull with maximal bar speed.
B. Deadlift – Sets: 4
x 5-6 (Weeks 1-4)
x 3-4 (Weeks 5-8)
Intensity: 80-90% of your CLEAN DL 1RM
C. Push Press – Sets: 4 x 6-8
D. Barbell Rows – Sets: 4 x 8-10
E. Trunk Work (Hanging Leg Raises, Side bends with empty bar on your back) – Sets: 3 x 15-20
Friday: Explosive Strength and PAP
PAP Complex: 3 sets
A1. Heavy Front Squat – 3 reps at 85-90% of 1RM; rest :10secs
A2. Clean from Blocks: 3 reps (at 60-75%) immediately after each squat set; rest: 2-3 minutes between complexes
B. EXPLOSIVE Box Jumps 3 x 5; focus on one rep at a time being as explosive as possible; rest 1 min
C. Push Jerk 4 x 4-6; rest 2
D. Glute Ham Raise 3 x 15
Saturday: Accessory Work and Recovery
Snatch Technique work (Light) 5 x 3 – Intensity: 60-70% of 1RM
Overhead Squat 4 x 6-8
Seated Dumbbell Shoulder Press 3 x 12-15
D1. Banded Face Pulls 3 x 15; rest 0 D2. Banded upright rows 3 x 15; rest 1
Sunday: Rest and Recovery Full rest day to allow for recovery and muscle repair.
Detailed Program Highlights and Emphasis
Weeks 1-4: Strength and Hypertrophy Focus
Volume and Intensity:
Higher volume with moderate to heavy weights.
Focus on building a strong foundation with hypertrophy and strength work.
Snatch & Clean Technique:
Emphasize proper form and technique in the snatch & clean.
Use moderate weights to allow for technique improvements.
Traditional Strength Training:
We’ve incorporated compound lifts like squats, deadlifts, and presses to build overall strength. We also routinely rotate accessory exercises that target specific muscle groups to build positional strength.
Weeks 5-8: Explosive Strength and Speed
Volume and Intensity:
Increase intensity with heavier weights and lower reps.
Focus on explosive movements and speed strength.
Snatch + Clean & Jerk Technique:
Continue emphasizing technique but increase intensity to prepare for maximal lifts.
Perform heavy strength exercises followed by explosive movements to maximize power output.
Plyometric Training:
Incorporate plyometrics once a week to improve explosiveness and speed.
Exercises like box jumps and cleans from blocks complement the strength work.
Recovery and Nutrition — all around the world it’s the same song, it’s the same old song!
Sleep – Aim for 7-9 hours of quality sleep per night to support muscle recovery and growth.
Nutrition – Protein: Consume 1.6-2.2 grams of protein per kilogram of body weight daily to support muscle repair.
Carbohydrates: Ensure adequate carbohydrate intake to fuel workouts and replenish glycogen stores. Include complex carbs like whole grains, fruits, and vegetables.
Healthy Fats: Incorporate healthy fats from sources like avocados, nuts, seeds, and olive oil to support overall health and hormone production.
Hydration – Stay well-hydrated to maintain performance and facilitate recovery. Don’t forget your electrolytes!
Active Recovery – Incorporate light activities such as MAP 10, kayaking, swimming, walking, yoga, or stretching on rest days to promote blood flow and reduce muscle soreness.
Monitoring Progress
Tracking your progress is essential for adjusting your program and ensuring continuous improvement.
Use a training log to record your workouts, including weights used, sets, reps, and any relevant notes on how you felt during each session.
Regular Testing: of your 1RMs to gauge strength improvements and adjust training intensities accordingly.
Adjustments – be sure to make them based on your progress and recovery. Then you can modify variables such as intensity, volume, and exercise selection to avoid plateaus and continue to make training fun and make sure youre maximizing your gains.
Final Thoughts
This 8-week Olympic weightlifting program combines traditional strength training with post activation potentiation (PAP) to enhance strength, explosive power, and speed in the and clean. By following this structured and periodized approach, you can achieve significant improvements in your lifting performance. Stay consistent, prioritize proper form, and adjust the program as needed to continue progressing toward your Olympic lifting goals. I hope you’ve enjoyed this article and that you find it beneficial in your training. Ive been writing individual and team/group training plans for almost two decades and am very passionate about helping folks achieve their goals. If you need helping to achieve your goals let me know and Id be happy to help you, too. Until next time, all the best!
Cyber threats are everywhere. Learn nine expert-approved cybersecurity practices, from password hygiene to phishing prevention, that help protect your data, privacy, and peace of mind.
In today’s hyperconnected world, being hacked isn’t just a risk — it’s a near inevitability if you’re not prepared. Whether you’re an individual, a small business owner, or part of a larger organization, protecting your data should be a daily habit, not an afterthought.
Hackers exploit the smallest cracks: weak passwords, outdated software, and misplaced trust. The good news? A few consistent habits can make you a far harder target.
Here are nine proven ways to reduce your risk of being hacked, simple, practical, and backed by modern cybersecurity best practices.
Use Strong, Unique Passwords
Weak or reused passwords remain one of the top causes of account compromise. A strong password should be:
At least 12 characters long
Include a mix of upper and lowercase letters, numbers, and symbols
Avoid personal details like your pet’s name or birthday
Pro Tip: Use a password manager to create and store unique credentials safely — it’s far more secure than your memory (or sticky notes).
2. Enable Multi-Factor Authentication (MFA)
If passwords are your front door, MFA is your deadbolt. This simple tool requires an additional verification step — like a text message code or an authentication app prompt — before granting access.
Even if a hacker steals your password, MFA can stop them cold. Enable it everywhere you can: email, banking, social media, and especially your work accounts.
Keep Software and Systems Updated
Cyber attackers love outdated software — it’s like an open window. Enable automatic updates on your devices, browsers, and security tools to patch vulnerabilities before attackers can exploit them.
Updates aren’t annoyances; they’re armor.
4. Spot and Stop Phishing Scams
Phishing remains the #1 way users get hacked. Attackers use fake emails or messages that mimic trusted sources to trick you into clicking malicious links or revealing credentials.
Stay sharp:
Check sender addresses carefully
Hover over links before clicking
Be skeptical of urgent or emotional language (“Your account will be suspended!”)
When in doubt, contact the organization directly
Education here pays off, once you’ve spotted a good phish, you’ll never unsee the patterns.
Secure Your Home Network
Your Wi-Fi router is the gateway to everything on your home network.
Change the default password immediately after setup.
Use WPA3 encryption (the most secure standard).
Disable WPS and consider hiding your SSID.
Set up a guest network to isolate visitors and IoT devices.
A few minutes of setup can close the door on thousands of automated attacks.
Use a Virtual Private Network (VPN)
When connecting to public Wi-Fi (airports, cafes, hotels) use a VPN to encrypt your internet traffic. This prevents hackers from intercepting data like login credentials and personal info.
Choose a reputable, paid VPN provider. (Free ones often collect your data instead of protecting it.)
7. Be Mindful of What You Share Online
Every social post is a breadcrumb. Hackers use personal details to guess passwords, craft phishing messages, or reset your accounts.
Limit what you share publicly, especially location check-ins and birthdates. Remember: oversharing fuels social engineering — the human side of hacking.
Regularly Back Up Your Data
Ransomware doesn’t work if your data is safely backed up. Use the 3-2-1 rule:
3 total copies of your data
2 different storage types (cloud + external drive)
1 kept offline
Automate backups and test them occasionally — a broken backup is no backup at all.
9. Educate Yourself and Your Circle
Technology changes fast — human habits change slowly. Stay updated on emerging threats, and share what you learn with coworkers, friends, or family.
Security awareness training and cybersecurity newsletters are excellent ongoing resources.
Cybersecurity is everyone’s job. The more we all understand, the safer we all become.
Final Thoughts
Avoiding being hacked isn’t about paranoia — it’s about preparation. Each of these habits strengthens your security posture one layer at a time.
Think of cybersecurity as compound interest: small daily actions, multiplied over time, create unbreakable resilience.
Stay curious. Stay cautious. Stay secure.
*Updated October 2025: refreshed to reflect updated security practices for the modern threat landscapes.
Here’s a sample 8-Week Hypertrophy Phase for Building Strength in the High Bar Back Squat. The high bar back squat is a foundational exercise for developing leg strength, power, and muscle hypertrophy. This 8-week hypertrophy program focuses on squatting twice a week, with an emphasis on high-repetition sets in the 15-20 rep range to stimulate muscle growth. Complementary accessory exercises, proper recovery, and nutrition are also crucial for maximizing gains during this phase.
Program Overview The 8-week hypertrophy phase is divided into two 4-week blocks. Each block progressively increases the intensity and volume of your workouts to optimize muscle growth and strength. The program includes two squat sessions per week, supplemented with accessory exercises to target supporting muscle groups and ensure balanced development.
Week 1-4: Volume Accumulation
Focus: Build a foundation of muscle mass and muscle endurance.
Rep Range: 15-20 reps
Intensity: 50-60% of 1RM
Frequency: Twice per week
Week 5-8: Intensification
Focus: Increase intensity, maintaining high volume, and technical proficiency.
Rep Range: 12-15 reps
Intensity: 60-70% of 1RM
Frequency: Twice per week
Weekly Training Schedule
– Monday: High Bar Back Squat Focus
High Bar Back Squat: 4 sets of 15-20 reps
Romanian Deadlifts: 3 sets of 15-20 reps
Bulgarian Split Squats: 3 sets of 15-20 reps per leg
Front Foot Elevates Split Squat (FFESS): 3 sets of 20 reps – 10 per leg
Single leg, body weight calf raises: 3 sets of 20-25 reps
– Thursday: High Bar Back Squat Focus
High Bar Back Squat: 4 sets of 15-20 reps
Walking Lunges: 3 sets of 15-20 reps per leg
Front Squats: 3 sets of 10 reps at 40-50%
Frog Pumps: 3 sets of 15-20 reps
Tib Raises: 3 sets of 30 reps
Week 5-8 Adjustments
As you progress into the second block, increase the intensity by raising the weight and slightly lowering the rep range to 12-15 reps per set while maintaining the same structure and exercise selection.
Monday: High Bar Focus
High Bar Back Squat: 4 sets of 12-15 reps
Romanian Deadlifts: 3 sets of 12-15 reps
FFESS: 3 sets of 12-15 reps per leg
Reverse Hyper: 3 sets of 12-15 reps
Single leg, body weight calf raises: 3 sets of 15-20 reps
Thursday: High Bar Focus
High Bar Back Squat: 4 sets of 12-15 reps
Walking Lunges: 3 sets of 12-15 reps per leg
Front Squats: 3 sets of 10 reps at 40-50%
Frog Pumps: 3 sets of 15-20 reps
Tib Raises: 3 sets of 15-20 reps
Recovery and Nutrition: Prioritizing recovery and proper nutrition is crucial for maximizing gains during the hypertrophy phase:
Sleep: The NUMBER 1 thing you can fix to see increases in the gym — adequate rest and recovery! Aim for 7-9 hours of quality sleep each night to support muscle recovery and growth.
Nutrition:
Protein: Consume 1.6-2.2 grams of protein per kg of body weight daily to support muscle repair.
Carbohydrates: Ensure adequate carbohydrate intake to fuel workouts and replenish glycogen stores. Include complex carbs like whole grains, fruits, and vegetables.
Healthy Fats: Incorporate healthy fats from sources like avocados, nuts, seeds, and olive oil to support overall health and hormone production.
Hydration: Stay well-hydrated to maintain performance and facilitate recovery.
Active Recovery: Incorporate intensity work on such as MAP 10 training, walking, kayaking, yoga, or stretching on rest days to promote blood flow and reduce muscle soreness.
Monitoring Your Progress: Tracking your progress is essential for adjusting your program and ensuring continuous improvement:
Training Log: Record your workouts, including weights used, sets, reps, and any relevant notes on how you felt during each session.
Regular Testing: Periodically test your 1RM to gauge strength improvements and adjust training intensities accordingly. I’d suggest testing your 1RM every 3 to 4 months.
Adjustments: Based on your progress and recovery, modify variables such as intensity, volume, and exercise selection to avoid plateaus and continue making gains.
Final Thoughts:
An 8-week hypertrophy phase focused on the high bar back squat can significantly enhance your leg strength and muscle mass. By incorporating a structured training program that emphasizes high-repetition sets, prioritizing recovery and nutrition, and monitoring your progress, you can achieve substantial gains in your squat performance and overall strength. Stay consistent, maintain proper form, and adjust your program as needed to continue progressing towards your strength and hypertrophy goals.
Always remember, quality of reps over quantity of reps!
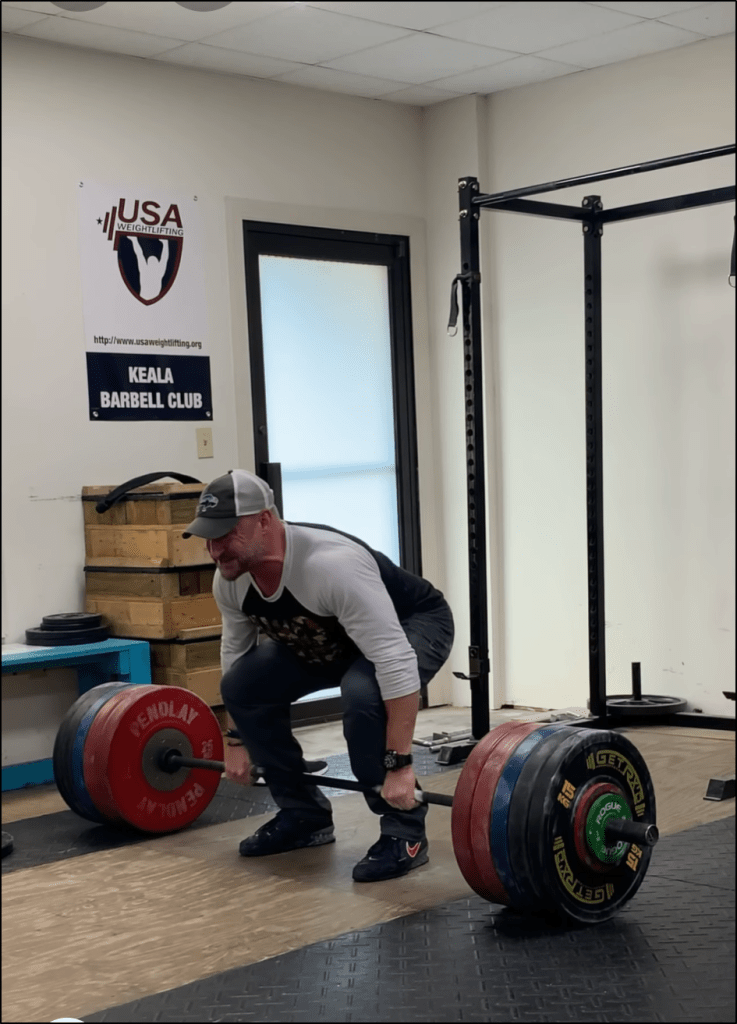
The deadlift is a foundational exercise in Olympic weightlifting, crucial for developing overall strength, maximum power, and athletic performance. Improving your deadlift can enhance your performance in the clean and jerk, snatch, and other compound lifts. Below you’ll find detailed strategies to enhance your deadlift, focusing on technique, strength training, range of motion work, and basic recovery strategies.
1. Perfect Your Technique — the main point here is this exercise will only help improve your lifts if it looks like the the first pull of the lifts. We are emphasizing the clean variation of the deadlift not the traditional deadlift.
Technique is paramount in the deadlift. Proper movement pattern not only reduces the risk of injury but also maximizes strength gains where it matters most. Here’s a more detailed breakdown of the essential components of deadlift technique:
Foot Positioning:
Stance: From the start, use your pulling position in the clean and/or snatch as reference. Like the conventional deadlift though be sure not to begin with your feet too narrow or too wide. My starting position varies slightly but should almost always be EXACTLY the same. Stand with your feet hip/shoulder-width apart, ensuring your toes are pointing slightly outward. How much your toes point out will determined by your hip structure genetically and your over mobility or lack-there-of. No matter where you begin, you want it to a habitual and it be a position to allow for a stable base and optimal leverage during the 1st pull, i.e. the deadlift portion of the movement.
Setup: Place the barbell over the mid-foot, close to your shins. This minimizes helps prevent the bar from traveling forward off the ground and helps keep it from getting out of position in any other portion of the lift. Even though some of you are not martial artists always remember this phrase — position before submission. This means make sure you put/keep the bar in the correct position throughout the movement so you can have MAXimal control over the bar throughout the movement.
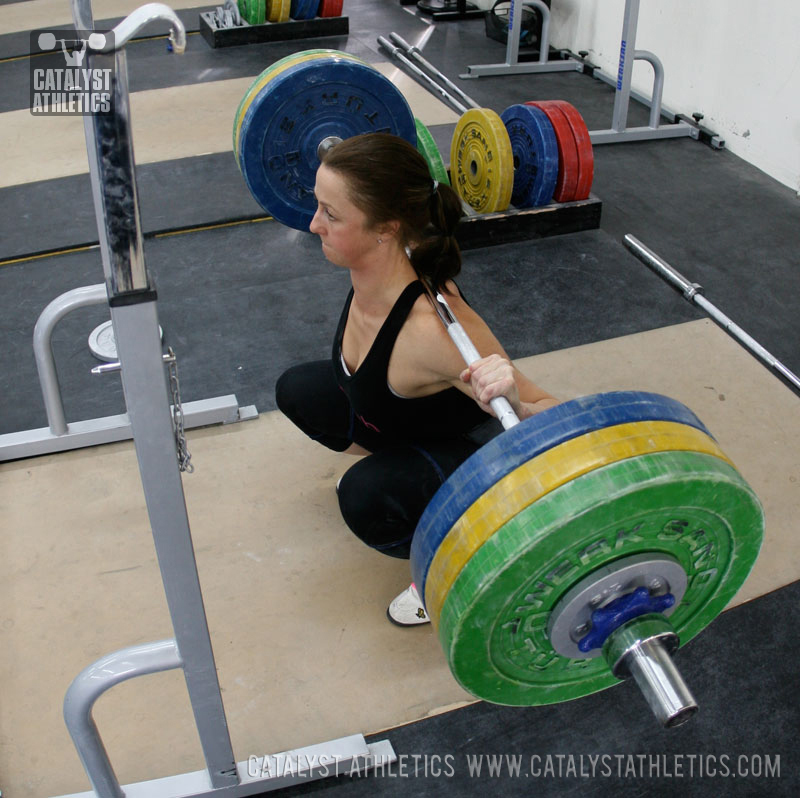
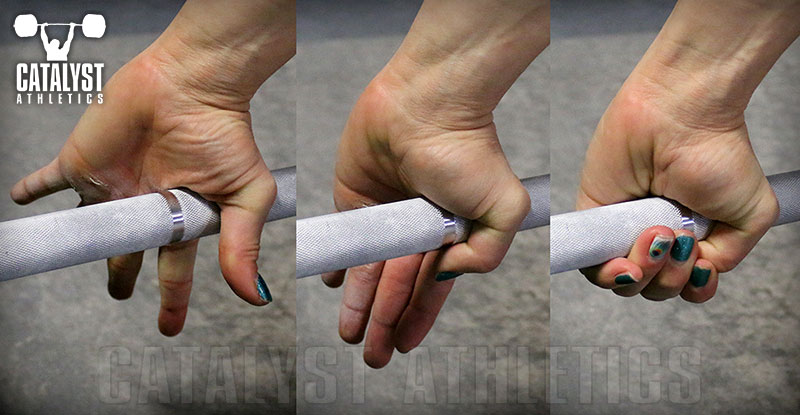
Grip: There’s only one and that’s the hook grip. get used to it early and make it habitual.
Hook Grip: Thumb is wrapped around the bar and secured by the fingers. This grip is more secure but can be uncomfortable initially.
Bar Path:
Proximity: Keep the barbell close to your body throughout the lift. The bar should travel in a straight line from the ground to the lockout position. This minimizes the distance the bar travels and reduces the strain on your lower back.
Hips and Back:
Starting Position: Begin with your hips lower than in a conventional deadlift, and your torso more upright. This engages your legs more effectively and helps you get used to using your legs to DRIVE the earth away.
Spine Position: Maintain a neutral spine throughout the lift. Avoid rounding your back to prevent injuries. Engage your core to stabilize your spine.
Pulling Motion:
Initial Lift: Drive through your WHOLE FOOT, extending your hips and knees simultaneously. Your shoulders should be slightly in front of the bar at the start.
Engagement: Engage your lats to keep the bar close to your body and prevent it from drifting forward.
Lockout: Fully extend your hips and knees at the top of the lift, ensuring your shoulders are back and your chest is up.
2. Build Strength with Accessory Exercises
Incorporate accessory exercises to target the muscles involved in the deadlift. These exercises help to build strength and address any weaknesses:
Execution: Stand in your snatch or clean pulling stance with a clean grip on the bar. Set your back in the same extension you use to pull the snatch and clean and brace your trunk forcefully.
Hinge at the hip while bending the knees very slightly to bring the bar as far down the legs as possible without losing any back extension. Actively keep the bar as close to the legs as possible throughout the motion.
Stay balanced evenly over the whole foot rather than pushing the hips back more than necessary and shifting to the heels. This will limit how much weight you can handle, but it will make the exercise more effective by increasing the force on the hips and back while reinforcing the balance we want in the snatch and clean, as well as strengthening the back and shoulders’ ability to keep the bar close to the body.
Stay braced tightly so as you change directions at the bottom, you don’t allow any softening of the back extension.
If you’re mobile enough to get the plates to the floor with perfect back extension, still stop just short of touching—the changing of direction without compromising back extension is an important element of the exercise.
Benefits: Focuses on the hamstrings and glutes, improving the posterior chain strength essential for a powerful deadlift.
Execution: The good morning is a posterior chain strength exercise that emphasizes isometric back extension strength.
Place the bar on the back as you would for a back squat. You can use either your squat or pulling stance depending on which you want to focus on.
Brace the trunk forcefully with the lower back neutral or slightly more extended and the upper back flattened as much as possible.
Bend the knees very slightly as you hinge at the hips as far as you’re able without losing back extension. Bend forward at a controlled speed, and recover at a natural to quick speed.
Maintain whole foot balance or shift slightly more to the heels, but keep the whole foot in contact with the floor.
Don’t allow your back to soften as you change direction in the bottom to stand again—resisting that force with a rigid trunk is a primary element of the exercise.
The knees can be bent more to shift more of the work to the glutes than the hamstrings, or can be locked straight to maximize hamstring emphasis.
Benefits: Strengthens the lower back, glutes, and hamstrings, promoting better hip hinge mechanics.
Pendlay Rows: AKA Bent-over row, bent forward row, barbell row
Execution: The bent row is a basic but effective upper body pulling exercise that strengthens the upper back, shoulders and arms.
Hold the bar with a clean-width grip, brace your trunk in the same position you would when pulling from the floor, and hinge forward at the hips while bending the knees to bring your trunk just above horizontal, letting the bar hang at arms’ length close to the legs.
Pull the bar to the abdomen, squeezing your shoulder blades back together and forcefully extending the upper back at the top of each rep. Lower the bar to full elbow extension without losing your braced back position.
Notes The bent row can be performed strictly with a controlled tempo, or with a little body English to put some speed on the bar and then reach the trunk into the bar at the top of the row. The angle of the trunk can also be varied depending on the desired effect, from horizontal to closer to 45-degrees—the higher the angle, the more heavily it can be loaded, but the smaller the range of motion.
Benefits: Develops mid-back strength, crucial for maintaining proper bar path and posture during the deadlift.
Execution: Fix the ankles in a glute-ham bench or similar adjusted to place the pad on the upper thighs. Bend at the hip and back to hang straight down from the hip—back relaxed and trunk hanging vertically.
Extend the hip and back together to bring yourself up to an extended position above horizontal in which the entire back, including the upper back, is extended completely and the glutes are forcefully contracted. Lift your head up at the top to reinforce upper back extension.
For unweighted back extensions, placing the hands behind the head is recommended to help encourage better extension of the upper back. For weighted back extensions, hold the weight in the form of a barbell or dumbbell behind the neck to ensure better resistance and better reinforce that upper back extension.
Notes Technically, this execution is combined back and hip extension. Back extension can be isolated by fixing the hips in place with the glutes and flexing and extending only along the spine. This can be assisted by relocating the fulcrum or pad of the bench closer to the hips.
Trunk Work: Copenhagen Plank, Chinese Plank (add weight if/when you can) Russian Twists: Leg Raises: Lying Leg Raises. For the Copenhagen & Chinese planks think doing 3-5 sets of 1min resting 1-2 mins between for all of the others think 3-4 set of 15-25 reps per exercise and also resting 1-2 mins between sets.
Execution: Use a wide grip, similar to a snatch. Perform the deadlift with this grip.
Benefits: Enhances upper back and grip strength and increases the range of motion.
3. Focus on strength in your end ranges of motion not simply “mobility” or being “flexible”
Mobility and flexibility are vital for performing a safe and effective deadlift and overall quality of your movement pattern(s). Think of and possibly implement these movements into your mobility/ROM work exercises into your routine:
Hips: Perform hip flexor stretches, pigeon pose, and hip circles to improve hip flexibility.
For your hamstrings think of using using dynamic and static stretching to enhance hamstring flexibility, allowing for better hip hinge movement. Things like poor man’s GHR, Frankensteins, Hamstring sweeps, and so on.
Ankle Mobility: Incorporate ankle plantar and dorsiflexion exercises to ensure you can maintain proper foot positioning and balance. Worst case scenario just do a couple of slow, controlled bodyweight double and single calf raise to get your calves and ankle complex warm/fired up and ready to lift!
Thoracic Mobility: Here really focus on getting the support structure of your t-spine loose and work on what you need to get yourself closer and closer to the best starting position you can achieve.
Here’s a great exercise The Barbell Physio just dropped on their IG page:
Progressive overload is essential for continuous improvement. Gradually increase the weight you lift, the number of repetitions, or the volume of your training sessions to challenge your muscles and stimulate growth. Here’s how to effectively implement progressive overload:
Linear Progression: Increase the weight lifted in small, consistent increments/percentages each week.
Volume Training: Add more sets and reps to your routine, focusing on maintaining proper form.
Tempo Variations: Incorporating tempo with your lifts, primarily slow eccentrics (lowering phase), to increase time under tension and build strength are of paramount importance. Using slow tempos also help you feel the muscles you use to do the lifts, and can be the greatest tool you’ll be exposed to help you master the positions of the lifts.
5. Last, and certainly not least, prioritize Recovery
Recovery is just as important as training itself. Proper recovery ensures that your muscles repair and grow stronger, and reduces the rick of injury.
Key recovery strategies include:
NUMBER ONE! Adequate Sleep: Aim for 8-9 hours of sleep per night to support muscle recovery and overall health.
Nutrition: As one famous fitness influencer one said — you can only piss in the gas tank for so long and expect elite performance. So, be sure to quality proteins, healthy fats, and lots of fruits and vegetables. Consider post-workout nutrition/protein shakes if you struggle to meet your daily macros to aid muscle repair. But, first and foremost, be sure you are focusing on eating whole foods vs supplementing with any kind of shakes. Yes, use them when necessary but only when necessary.
Hydration: Stay well-hydrated to maintain muscle function and performance.
Active Recovery: Engage in low-intensity activities such as walking, jogging, rowing, swimming or any sort of quality mixed modal training to help promote blood flow and muscle recovery.
Improving your Olympic weightlifting deadlift requires a comprehensive approach that includes perfecting your technique, incorporating accessory exercises, focusing on mobility, implementing progressive overload, and prioritizing recovery. By consistently applying these strategies, you will build the strength, power, and resilience needed to excel in your deadlift and overall Olympic weightlifting performance. Remember, progress takes time and dedication, so stay patient and committed to your training regimen. More importantly, deadlifting feels cool because you can move a lot of weight but don’t forget to actually do the lifts!
Discovery and fingerprinting are where recon stops being guesswork and starts being a map. Over the next few weeks I’ll dig into Nmap and other recon tools — for now, here’s a compact, practical list of Nmap switches worth committing to memory for pentesting exams and real-world ops. Don’t just memorize the letters — learn the purpose and the use case.
Quick legal note: Only scan systems you own or have explicit permission to test. Unauthorized scanning can be illegal and definitely burns bridges.
Basic target input / listing
nmap -iL targets.txt Scan targets from a file. Use when you have a long list to automate.
nmap -iR 100 Scan 100 random hosts. Good for practice/learning about global scanning patterns in a lab.
nmap 192.168.1.10 -sL List-only — no probes. Use to verify target resolution without touching ports.
Host discovery vs port scan
nmap 192.168.1.1/24 -sn Ping/host discovery only (no port scan). Fast way to find live hosts on a subnet.
nmap 192.168.1.1-5 -Pn Skip host discovery (treat hosts as up). Useful when ICMP/ARP are blocked but you still want to try ports.
Port specification
nmap 192.168.1.1 -p 21 Scan a single port (FTP, in this example).
nmap 192.168.1.1 -p 21-100 Scan a specific port range. Use when you want targeted scanning (faster than full 65k).
nmap 192.168.1.1 -O Remote OS detection (TCP/IP stack fingerprinting). Useful when you need OS-level attack vectors.
nmap 192.168.1.1 -A Aggressive: OS detection + version detection + scripts + traceroute. Good for a quick, deep look — loud and obvious on the network.
Timing / IDS evasion
Timing templates adjust scan speed and stealth. Choose based on network reliability and detection risk.
-T0Paranoid — ultra-slow. Used to evade IDS or noisy logging systems.
-T1Sneaky — very slow.
-T2Polite — slows scans to reduce bandwidth/impact on target.
-T3Normal — default.
-T4Aggressive — faster, assumes stable network.
-T5Insane — very fast; only on extremely reliable links or internal lab networks.
Stealth check in an IDS lab: nmap -T1 -sV <host> → slow timing to reduce IDS noise.
Full noisy recon in a lab environment: nmap -A -T4 <target> → quick comprehensive view.
Closing — don’t memorize blindly
The exam question isn’t “what flag is X” — it’s “which flag solves this problem.” Memorize the purpose and practice applying them in labs. Over the coming weeks I’ll publish deeper examples for each of these switches, show script usage, and map Nmap output to real exploitation workflows.
Well, well, well, the world has changed a lot since my last post. Definitely have a lot of irons in the fire as the old saying goes. Currently working on the PenTest+ certification from CompTIA. I’ll be following that up with the CEH exam. Between those two certs I’ll be working on and getting the ISACA’s Cybersecurity Audit Certificate. 2024 is shaping up to be another great year!
A lot has been going on over the last 6 months or so. One of the primary things is that I’ll be doing is taking the ISC(2) Certified Cloud Security Professional exam on 4 NOV.
Domain 1 covers architecture, concepts, and design. Domain 1 also includes cloud computing concepts which covers broad network access, on-demand services, resource pooling, rapid elasticity, multi-tenancy and more. It also includes cloud service models, IaaS, storage types, volume storage, object storage, PaaS, storage types and more.
The cloud service deployment model covers public cloud, private cloud, hybrid cloud, community cloud, management plane, and virtualization.
The things that are covered in the rest of Domain 1 are: Security aspects of virtualization – Type 1 and Type 2 hypervisors. Principles of secure cloud computing – covering roles and responsibilities, design principles and Identity and Access Management (IAM).
Design requirements – covering requirements analysis, functional requirements, inventory, valuation and more. Cloud model boundaries were also covered as well as the cloud service models, IaaS, PaaS and SaaS. Protecting sensitive information portion covered hardening, encryption, layer defense, common threats, secure data life cycles and more. And finally, the Threat Modeling portion of Domain 1 includes STRIDE, DREAD, the OWASP Top 10 security threats and the CSA Top 9 risks.
I’ll outline Domain 2 tomorrow along with some other important details.
Ive also been able to make back to CrossFit on a regular basis. Ive also been able to get out on the water a little more often and once I pass this exam in November I’ll take a couple months off and then at the beginning of the year go ALL IN on Heath Adams Practical Network Penetration Testing certification. After that I will take a nice long break from taking certification exams.
Today as a break from studying I took a nice long walk and I found this cool writing spider along the way.
Nice easy two hour stroll through the eastern pinelands
Our old friend the writing spider
And, it’s kind of fitting that I haven’t posted any sort of lifting videos in…forever, and when I finally get back to training that I end up posting a lifetime PR for my deadlift at 517#. Easy day.
When I first wrote this, I wasn’t chasing promotions or algorithms. I was just trying to keep showing up to train, to learn, to get a little better each day. Back then, “rep after rep” was more than a training mantra. It was a way to stay grounded when progress felt invisible.
The hardest part wasn’t physical. It was the repetition, the daily grind that felt endless. Whether I was refining form under the barbell or troubleshooting code that refused to run, the challenge was the same: staying patient when nothing seemed to move forward.
Some days you make the lift. Some days the lift makes you. But the point is always to come back tomorrow.
At some point, I stopped expecting each session, physical or mental, to feel like a breakthrough. The breakthrough was the habit itself. The more I showed up, the more the process began to reveal patterns: what worked, what didn’t, and how small adjustments compound over time.
In strength and in cybersecurity, consistency is the quiet multiplier. Each drill, each review, each run-through, one more rep toward mastery.
That same mindset carries through everything I do now — training teams, hardening systems, or writing content. I don’t chase perfect outcomes anymore. I look for steady iterations. A little tighter form. A cleaner line of code. A stronger policy.
That’s how resilience is built, not simply through intensity, but through consistency.
Progress doesn’t shout. It stacks. And one day, you realize the work that used to test you has become the warm-up.
Training for the day:
7 mins of:
7 Banded Sumos
7 Banded bodyweight squats w/moderate band
7 Calf raises
+
A. Back Squat 10, 10,10,10; rest 2/2:30 – 10 RM-ish
B1. Heels elevated air squats x 10 x 3; rest :10
B2. RDL w/an empty bar, sweep away — lumbar focus x 15 x 3; rest 1
C. SL RDL stability, unloaded x 10 x 3; — 5 per leg; rest 1
+
10min alt EMOM:
20 Step-ups – 10 per
15 push-ups
Martial skill work — 5 x 5 min rounds of Z2-Z4 striking, upper push/pull bodyweight movements in trapping/grappling range, and take down defense/sprawling/working underhook escapes et cetera.
Today in my world of Linux and pentesting I worked on building out an Active Directory Lab and worked on the initial attack vectors when attacking an AD based system. Things like LLMNR Poisoning, Capturing NTLMv2 Hashes with Responder, Password Cracking with Hashcat, LLMNR Poisoning Defense, SMB Relay Attacks, Discovering Hosts with SMB Signing Disabled, Start SMB Relay Attack Defenses, & Gaining Shell Access.